[Update: Before buying anything, be sure to read part 2 as well, where I corrected some mistakes here!]
If you’re reading this, you may be one of the adults living in a household full of Minecraft fans who can’t agree on which version is better: Java edition (aka original flavor/classic Minecraft, played on a computer - the one you can mod like crazy) or Bedrock edition (available on iPhone, iPad, Switch, other gaming consoles, etc.).
… And if you’re cooped up in a house right now where everyone is a little on edge from not getting much of a break from each other, wouldn’t it be nice to be able to make both groups happy and able to play with each other at the same time.
As it turns out, you can do this! It’s not perfect, but it’s pretty great and it’s definitely better than nothing.
I’m documenting the information here for posterity and to hopefully provide a little sanity in a time of insanity.
Here are the requirements:
- A computer to host the server (I’m using a Mac, so these instructions will be written with macOS as the host for the server - yes these instructions work with macOS 10.15 Catalina)
- When Java (computer) Minecraft players want to play with each other, they need a paid-for Mojang account.
- When Bedrock players want to play with each other, they need a Xbox Live account.
- … but when Bedrock players want to play with Java players, you will need an additional computer-style Mojang account for each Bedrock player.
- Since you’re reading a guide about having both types of players play with each other, you’ve probably gone through the sign up for this before. But if it’s been a while, you can get additional Java Minecraft accounts at: minecraft.net
All of this is made possible with this wonderful tool: GeyserMC
GeyserMC is a proxy translator for the Minecraft Bedrock protocol. It runs separately from your Minecraft server and on-the-fly translates commands from Bedrock clients into Java client protocol as well as translating the Java server response back into Bedrock compatible information.
GeyserMC supports several different Minecraft server standards (there are many), but for the purposes of this article I’m going with CraftBukkit.
Both GeyserMC and CraftBukkit are open source and free and require Java to run them.
Things you need to download:
- AdoptOpenJDK 8 - use “OpenJDK 8 (LTS)” latest release. Even though Java is now up to version 14 or whatever, the entire Minecraft modding ecosystem is pinned very strictly to 8. This particular distribution is an easy to install, free, and legal to use distribution of OpenJDK.
- CraftBukkit server - I’d recommend downloading this specific version (1.15.2), as that’s what GeyserMC supports as of this blog post
GeyserMC - specifically the “Geyser.jar” artefact file from branch “inventory”, for now. This branch is where a lot of work is going on to make inventory for Bedrock players work better, especially if the players are in creative mode (like my youngest daughter adores playing). You can also build this from their Github repo directly if you like, but this is their continuous build server and any changes you see landing there show up here relatively quickly.- GeyserMC - [Please make sure to read part 2 for what changed here.] The “Geyser.jar” artefact file from branch “master”. You can also build this from their Github repo directly if you like, but this is their continuous build server and any changes you see landing there show up here relatively quickly.
How to set it up:
- Install the AdoptOpenJDK pkg file you downloaded. This will install OpenJDK to a subdirectory in
/Library/Java/JavaVirtualMachines - Note the name of this subfolder, it should be something like:
adoptopenjdk-8.jdk - Make a folder for the CraftBukkit server .jar file you downloaded and put the .jar inside that folder (I called my folder
server) - Make a (different) folder for the GeyserMC .jar file you downloaded and put the .jar inside that folder (I called my folder
proxy) - I don’t know if separate folders are required, it’s just that each of these files will generate many other files when they run - so I just kept them separate.
Now you just need some helper scripts to make it easy to turn on the Minecraft server and the GeyserMC proxy.
In the server folder, I created a script (text) file named server.sh and this is the contents:
In the proxy folder, I created a script (text) file named proxy.sh and this is the contents:
[ Note: If you’re not familiar or comfortable with how to make script files on macOS, you can visit this page and click the “Download ZIP” button at the top right. The .zip file you download, when you open/expand it, will contain both of the scripts. Simply unzip the zip file and move the .sh files into their respective folders. ]
How to run it:
Now you will need to run both the server and the GeyserMC proxy. You’ll need to open Terminal app.
To run the server, after launching Terminal, you need to change directory (cd) into the server folder.
If you don’t know how to do this, type cd(space) (that’s 2 letters, followed by the spacebar) and then drag the folder you made named server and drop it right onto the Terminal window.
It will probably fill it out to look something like:
cd /Users/yourname/Desktop/server
After it fills out the path to the server folder, simply hit Return on your keyboard and you’ll have successfully changed to the server directory.
Now you’ll need to launch server.sh. If you downloaded the copy via the .zip file tip above, you’ll need to type a few commands first:
xattr -c -r server.sh
chmod a+x server.sh
(These commands make it so your computer is ready to execute the server.sh script without complaining.)
Once you’ve done that, the command to start up the server is: ./server.sh (type that in and press Return)
You will (hopefully) see a series of messages come across the screen, like:
*** Error, this build is outdated ***
*** Please download a new build as per instructions from https://www.spigotmc.org/go/outdated-spigot ***
*** Server will start in 20 seconds ***
Loading libraries, please wait...
[19:00:25] [main/ERROR]: Failed to load properties from file: server.properties
[19:00:25] [main/WARN]: Failed to load eula.txt
[19:00:25] [main/INFO]: You need to agree to the EULA in order to run the server. Go to eula.txt for more info.
THIS IS OK, THIS IS EXPECTED!
Don’t worry about the outdated message if you see it. You should now see several new files inside the server folder, including a eula.txt file
Open/edit the eula.txt file and look for the line that says eula=false and change it to eula=true and save your changes.
[ Note: If you’re using TextEdit on your Mac to do this, make sure you don’t accidentally save this as Rich Text. You can tell if you’re doing this if you can see things like the toolbar for making text bold, itallic, etc. at the top of the file while you’re working on it. If you see those tools, make sure you go to “Make Plain Text” under the Format menu before you save your changes. ]
Now that you’ve agreed to the EULA, assuming you have your Terminal still open, you can simply re-type / re-run the command: ./server.sh
Now you should see some of the same messages as before - but after 20 seconds, you should see an interface appear for your (very own) Minecraft server:

As well as a bit of a flashback of a Dock icon:

YAY, your server is up - now for part 2:
Your Minecraft server is running at this point. It will have the IP address of the computer that you’re running it on (which you can find in System Preferences -> Network -> Wi-Fi or Ethernet) and be listening on the default port number of 25565. You can adjust this port later by editing the server.properties file it created, but for now, it’s easiest to just leave it alone.
Now let’s repeat what we did before, only now for the proxy folder:
You’ll want to make a new tab (cmd+T) or new window (cmd+N) in Terminal to run this second piece of software. Only one can be running per window/tab at a time.
To run the proxy, after making the new tab/window, you need to change directory (cd) into the proxy folder.
If you don’t know how to do this, type cd(space) (that’s 2 letters, followed by the spacebar) and then drag the folder you made named proxy and drop it right onto the Terminal window.
It will probably fill it out to look something like:
cd /Users/yourname/Desktop/proxy
After it fills out the path to the proxy folder, simply hit Return on your keyboard and you’ll have successfully changed to the proxy directory.
Now you’ll need to launch proxy.sh. If you downloaded the copy via the .zip file tip above, you’ll need to type a few commands first:
xattr -c -r proxy.sh
chmod a+x proxy.sh
(These commands make it so your computer is ready to execute the proxy.sh script without complaining.)
Once you’ve done that, the command to start up the proxy is: ./proxy.sh (type that in and press Return)
You should see some text like this:
[19:47:52 INFO] ******************************************
[19:47:52 INFO]
[19:47:52 INFO] Loading Geyser version 1.0-SNAPSHOT
[19:47:52 INFO]
[19:47:52 INFO] ******************************************
[19:47:53 INFO] Started Geyser on 0.0.0.0:19132
[19:47:53 INFO] Done (0.597s)! Run /geyser help for help!
>
The version you see may differ from mine, but this means your proxy is up and running.
Connecting your Minecraft Java clients:
As of the posting of this article, GeyserMC expects Minecraft Java edition to be 1.15.2. Aside from the ability to do mods, Minecraft Java edition is also cool because you have the ability to play historical versions as well as upcoming “snapshot” previews of new features. We made sure that the server was version 1.15.2 earlier with CraftBukkit, but we need to do the same with the Minecraft Java clients themselves as well.
To play Minecraft 1.15.2, you may not have to do anything - just look to the left of the “PLAY” button and see if it says 1.15.2:

If it doesn’t, you may need to go to “Installations” at the top and hit “New”:

And then give your new configuration a name and select “1.15.2” for your version:

After launching with “Play”, you can connect to your new server by using Multiplayer -> Direct Connect. Enter your IP address like this:
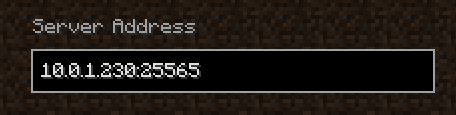
The format is IPADDRESS:PORT (where PORT should still be the default 25565 and IP address should be the IP of the computer running the server)
For Minecraft Java clients, they’re directly connecting to the server and this is a mostly vanilla experience for them.
… The same can’t be said of Bedrock / mobile clients!
Connecting your Minecraft Bedrock clients:
When I did this, I was using Minecraft on the iPad, available in the app store.
If you’re using a different Bedrock client, you may experience something different here - consider this fair warning!
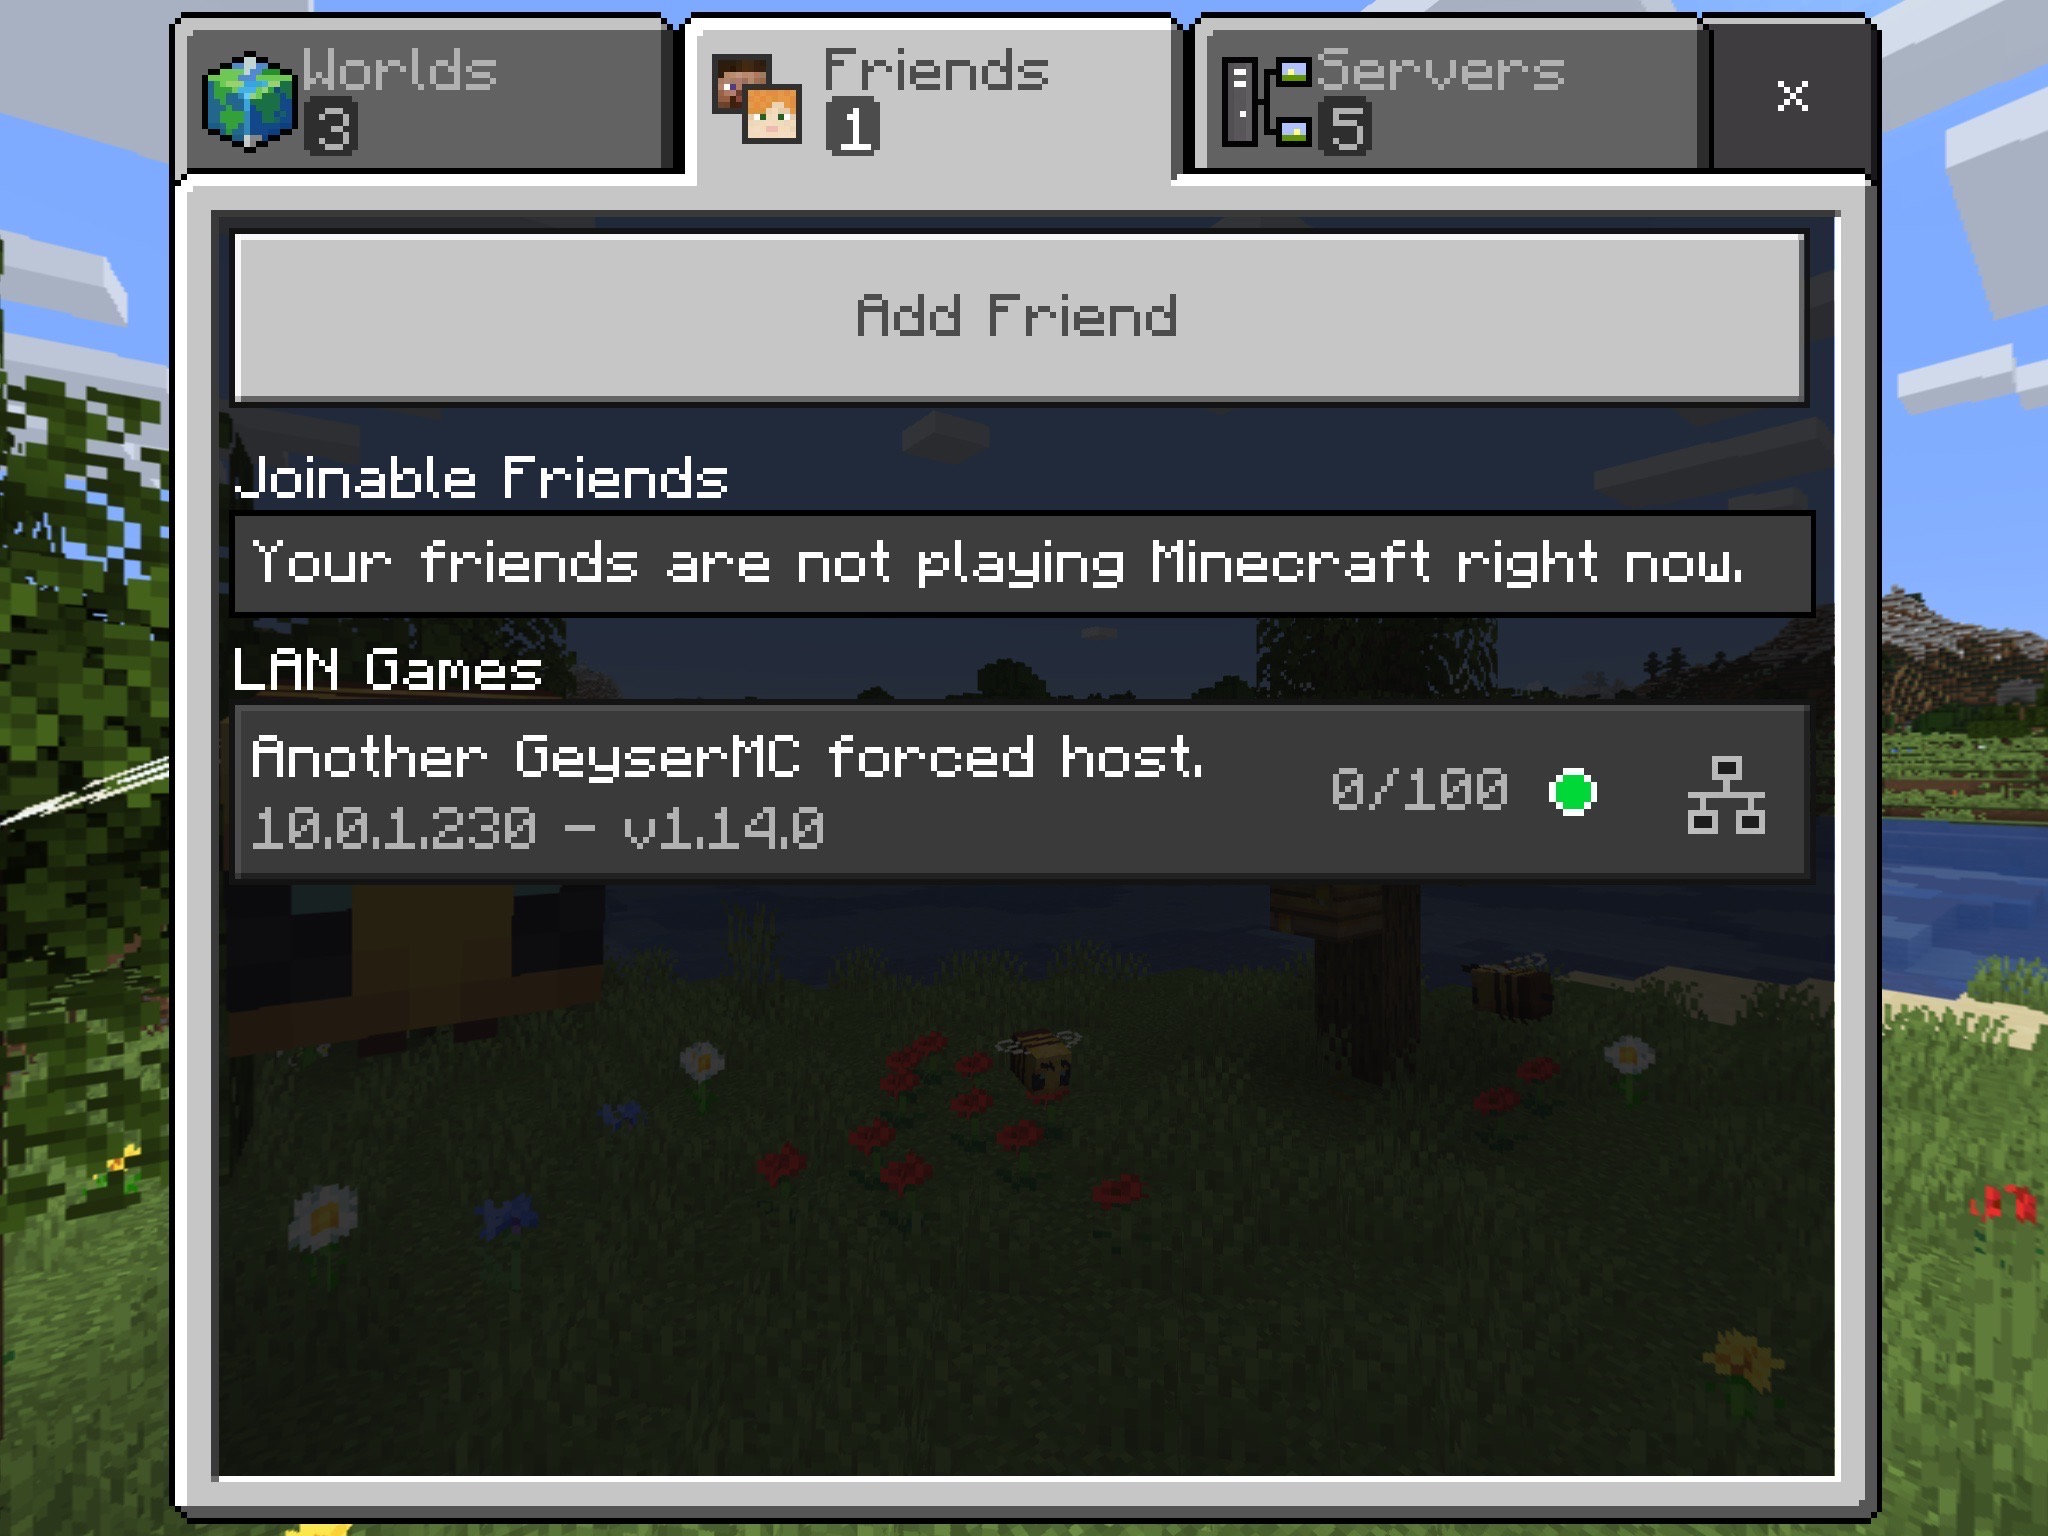
On the iPad, the client immediately notices there’s already a server available on the network:
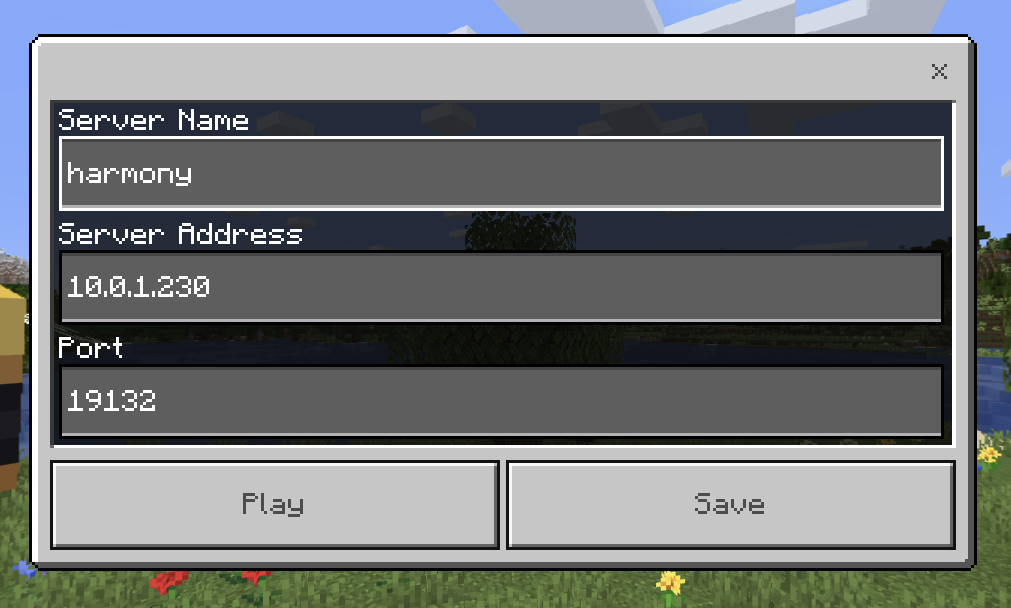
If yours doesn’t do this (because maybe you run multiple subnets in the house), you can still manually add the server under Servers -> Add Server:

and then give it a name and fill out the IP address (the port should already be set to the default for mobile, which is 19132):
Hit Save and it should be in your Servers list to connect to.
[ !Important Note!: If you go the route of using the Servers tab, Minecraft will require “for safety” that you sign up with a free XBox Live account in order to connect. This is likely because servers in this tab are usually remotely hosted, as opposed to local. Using the automatic discovered local “Friends” connection does not require this. ]
Once you connect to the server … things will look a little strange. You’ll see a sky with nothing in it.
![]()
You’re in a bit of an “inbetween” holding spot at this point, just try rotating your view by swiping your finger/with the controls and you should trigger a new dialog.

Now’s the part where it’s asking you to provide the “Minecraft Java” paid account credentials, which I mentioned at the beginning of this blog post. In order to act like a Minecraft Java client, the proxy you’re running on your computer has to obtain an authentication token for a full fleged Java computer client for connections. The username and password you provide is not sent via any third-party services, it only goes from your proxy software out to Minecraft themselves to get a token which it can then use with the Minecraft Java server.
Authentication can be a little glitchy here. You’ll know you’ve done it right when the world starts filling in. If a second or third authentication window presents itself at that point, you can use the little x in the corner and just close it to dismiss it.
What next?
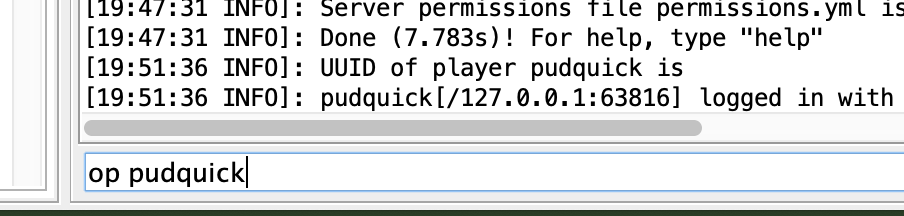
I highly recommend “op”ing (promoting users to operator / admin) the users, so that they can use “slash” / typed commands via Bedrock or Java client connections. It’s hard to see it in the Java CraftBukkit server interface, but there’s a little typing area in the lower right of the UI where you can type op usernamehere for connected users and press return to give them admin rights. The server will remember this for each username, you’ll likely only have to do this once.
Java players will probably be familiar with these, but this will be a new experience for Bedrock players. The place to type the commands is the speech bubble at the top of the screen.
The main command you’ll probably want is /gamemode with either /gamemode survival (standard Minecraft) or /gamemode creative (make whatever you want, Lego-style). By making every user an op, you’re giving them the ability to run any of the commands and change their own mode to suit their own play style.
What it’s like:
Overally, the proxy is pretty good! There are some little glitches here and there, like right now spawn eggs for creative players on mobile all appear black in color, plus sometimes if you click too quickly the server doesn’t see your action and you may have to slow down / repeat yourself. If you’re building large intricate structures, Java Minecraft players may notice blocks missing from those placed by Bedrock players. The Java view of the world is the “definitive” view, with the proxy providing best effort for mobile clients. Bedrock clients can quit and rejoin and the world should be “fixed” to match what desktop players see.
GeyserMC appears to be very active right now! Lots of patches coming in, don’t be afraid to check back and look for updated versions with new bug fixes on a regular basis. Generally you won’t have to worry about the server portion.
If your machine isn’t too old, you can probably even spin up Minecraft Java client on the same machine running the server and connect and play. That’s what I’ve been doing and it’s worked great (though the fans tend to stay on).
Saving things when you’re done:
Once all the clients quit and are disconnected, quit the GeyserMC proxy - look for a second little “Java guy” icon on your Dock and click on it and if you see “GeyserBootstrap” in the menubar, you selected the right one. Just select “Quit GeyserBootstrap”. If you don’t see a java Dock icon (because a client never connected to the proxy), you can go back to the tab or window you were running the proxy in and simply type Ctrl+C to stop it.
Quitting the server is even easier - just hit the close button red circle at the top left of the server UI. It’ll save all your changes and shutdown for another day.
Once these things are shut down, you can quit Terminal.
Ideally you found this information useful. If you have any comments or corrections for me, feel free to tweet at me. I had to turn off blog comments because I didn’t realize the Disqus “free” tier comment system put horrible ads at the bottom (I run an ad blocker).
As always, hope this helps.
- mike